> For the complete documentation index, see [llms.txt](https://docs.premsoft.de/llms.txt). Markdown versions of documentation pages are available by appending `.md` to page URLs; this page is available as [Markdown](https://docs.premsoft.de/en/plugins/auto-complete-and-validation.md).
# Auto-Complete and Validation
### Introduction
The User Data Autocomplete and Validation app for Shopware allows you to increase customer sign-ups and improve the quality of captured customer data.
Due to the intelligent and dynamic app design, new customers will no longer have to manually fill out the form, resulting in a greatly streamlined sign-up process.
Additionally, the provided validation controls ensure the collected info is much more accurate, meaning no amendments are required later and no problems with reaching customers after sales.
### Pre-requisites
The app can only be installed on a self-managed Shopware environment running at least version 6.2.0.
#### Generating and configuring Google API keys
The app requires two Google API keys to operate (as well as a Google account), as it utilizes two Google services.
* The **first API key** is required for auto-completion of address data and must be encoded with the **domain of your shop**.
* The **second API key** is required for the address existence check and must be protected with the **IP address of your shop**.
Follow these steps to generate and configure the Google API keys:
1. Login to [Google Console](https://console.cloud.google.com/). If you do not already have a Google account, [create one first](https://support.google.com/accounts/answer/27441?hl=en).
2. Select a project.\
\&#xNAN;*If you have not yet created a project, click **My First Project** and then **NEW PROJECT.** Enter a name for your project and click **CREATE**.*
3. From the project dashboard, click the top left-hand navigation menu, then select **APIs & Services** then **Credentials**.
4. Select **CREATE CREDENTIALS > API key** to create the **first API key**.
5. Click **Restrict Key** and then **HTTP referrers.** Enter your shop domain in the format: **\*.shopdomain.de**, then click **SAVE**.
6. From the project dashboard, click the top left-hand navigation menu, then select **APIs & Services** then **Credentials**.
7. Select **CREATE CREDENTIALS > API key** to create the **second API key**.
8. Click **Restrict Key** and then **IP addresses.** Enter the IP address of your shop, then click **SAVE**.
**Make a note of your two API keys, including which one is which, as you will need them later. You can return to the Google Console to manage or retrieve your API keys at any time.**
{% hint style="info" %}
Our extension is using the **Geocoding API**, die **Maps JavaScript API** and **Places API**. If you want, you can restrict your API key for these 3 APIs.
{% endhint %}
#### Enable Google API billing
Some of the Google APIs required by the app charge for usage, so you must enable billing for your account before you can use them.
Follow these steps:
1. Go to the [API Console](https://console.developers.google.com/).
2. From the list of projects, select the project you intend to use.
3. Access the left-hand side menu and select **Billing**.
4. Click **Enable billing**. Note: if billing is already enabled then this option is unavailable.
5. If you don’t yet have a billing account, create one.
6. Select your location, fill out the form, then click **Submit and enable billing**.
For more information on Google API charges, visit the [official Google article](https://support.google.com/googleapi/answer/6158867?hl=en).
#### Enable required APIs for your Google API project
Enabling a Google API associates it with the current project, adds monitoring pages, and enables billing for that API (if billing is enabled for the project).
To enable an API for your project:
1. Go to the [API Console](https://console.developers.google.com/).
2. From list of projects, select the project you intend to use.
3. If the APIs & services page isn’t already open, open the left-hand side menu and select **APIs & services**, and then select **Library**.
4. Select the following APIs: **Maps**, **Places** and **Geocoding**.
5. Click **ENABLE**.
### Installation
Install the app via **Extensions** > **My Extensions**. After installation, configure the app by selecting **My Extensions** > **Auto Complete and Validation for User Data** > **Configuration**.
Specify a **Sales Channel** to enable the app for. The default is All Sales Channels.
### General properties
The optional setting **Restrict Auto-Complete validation to countries** allows you to limit the address validation to certain countries or geographic regions. This can be useful if you are operating in countries where there Google has limited address data.
Use the multi-select field to select only the countries you wish to apply address validation to.
Click **Save** to save your changes.
### API access data
Make sure you have first generated and configured your Google API keys as detailed in [Generating and configuring Google API keys](broken://pages/tsaPTv4tK2uFPSg3ILcg).
1. Copy and paste the first key into the field **Google API Key 1**.
2. Copy and paste the second key into the field **Google API Key 2**.
3. Click **Save** to save your changes.
**This step is mandatory. The app will not function correctly without valid Google API keys.**
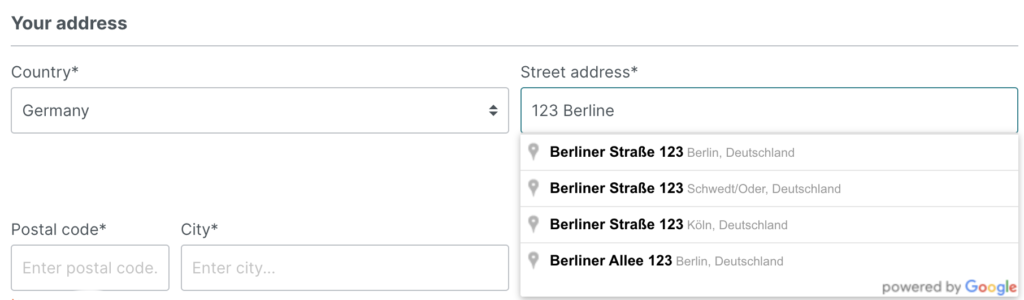
### Autocomplete properties
The autocomplete properties allow you to control the degree to which fields are automatically populated with information as the user completes the form.
| **Field** | **Type** | **Description** |
| -------------------------------------------- | --------------- | ---------------------------------------------------------------------------------------------------------------------------------------- |
| Language | Free text field | Defines the app language. Enter a country abbreviation, e.g. EN for English, DE for Germany, IT for Italian, etc. |
| Number of street suggestions | Numerical field | Defines the number of suggested street names that will appear underneath the Street Address field, based on the user’s input. |
| Always repopulate street, ZIP, city, country | Toggle | Enable this setting to automatically update fields based on new information entered by the user. |
| Suggest city | Toggle | Enable this setting to automatically suggest a city based on the information entered by the user. |
| Automatic capitalization | Toggle | Enable this setting to automatically capitalize the first letter of information entered by the user into fields such as the street name. |
| Disable automatic capitalization (street) | Toggle | Enable this option to disable automatic capitalization for the first letter of the street. |
| Disable automatic capitalization (city) | Toggle | Enable this option to disable automatic capitalization for the first letter of the city. |
| Default country | Dropdown | Select the default country from the dropdown menu. The user can override this by selecting another country. |
### Validation properties
The validation properties allow you to control the degree to which validation is applied to fields where the user enters their information.
| **Field** | **Type** | **Description** |
| ------------------------------------- | --------------- | --------------------------------------------------------------------------------------------------------------------------------------------------------------------------------------------- |
| Validate phone number | Toggle | Enable this setting to automatically check the format of the phone number to ensure it has an area code and is the right length. |
| Custom phone number validation | Free text field | Enter a custom regex value here for customized phone number validation (the above setting must be enabled for this to be applied). |
| Disable submit on error | Toggle | Enable this setting to disable the **Continue** button if the form contains any validation errors. |
| Country, ZIP code, street field order | Dropdown | To change the order of the fields, select one of the available options from the dropdown menu. The default option with country first is recommended as this results in a higher sign-up rate. |
| Validate street number input | Toggle | Enable this setting to automatically check that the street number entered by the user is valid for that street. |
| Street number check starts at | Free text field | Enter a numerical value here for the number of characters the user must enter before the street number validation begins. |
| Check address existence | Toggle | Enable this setting to automatically check that the address entered by the user is valid (e.g. it exists). |
| Show password strength | Toggle | Enable this setting to display a meter underneath the password field that shows the user how “strong” (secure) the password is. |
---
# Agent Instructions
This documentation is published with GitBook. GitBook is the documentation platform designed so that both humans and AI agents can read, navigate, and reason over technical content effectively. Learn more at gitbook.com.
## Querying This Documentation
If you need additional information that is not directly available in this page, you can query the documentation dynamically by asking a question.
Perform an HTTP GET request on the current page URL with the `ask` query parameter:
```
GET https://docs.premsoft.de/en/plugins/auto-complete-and-validation.md?ask=
```
The question should be specific, self-contained, and written in natural language.
The response will contain a direct answer to the question and relevant excerpts and sources from the documentation.
Use this mechanism when the answer is not explicitly present in the current page, you need clarification or additional context, or you want to retrieve related documentation sections.