> For the complete documentation index, see [llms.txt](https://docs.premsoft.de/llms.txt). Markdown versions of documentation pages are available by appending `.md` to page URLs; this page is available as [Markdown](https://docs.premsoft.de/en/plugins/affiliate-system/admin-dashboard.md).
# Admin Dashboard
After you have completed basic configuration of the Affiliate System, use the Admin Dashboard to monitor your partner, partner groups, orders and payouts.
Access the Admin Dashboard from your Shopware administration site, via **Marketing > Affiliate System**.
The main dashboard is divided into the following tabs:
* Dashboard (displayed by default when accessing the Admin Dashboard)
* Payout
* Order
* Partner
* Partner group
Please note: If you just have installed the extension then the section “Partner group” is most interesting for you. Because every partner needs to have a partner group (similar logic das for customer and customer group). After installation a default partner group is created but you need to configure it finally.
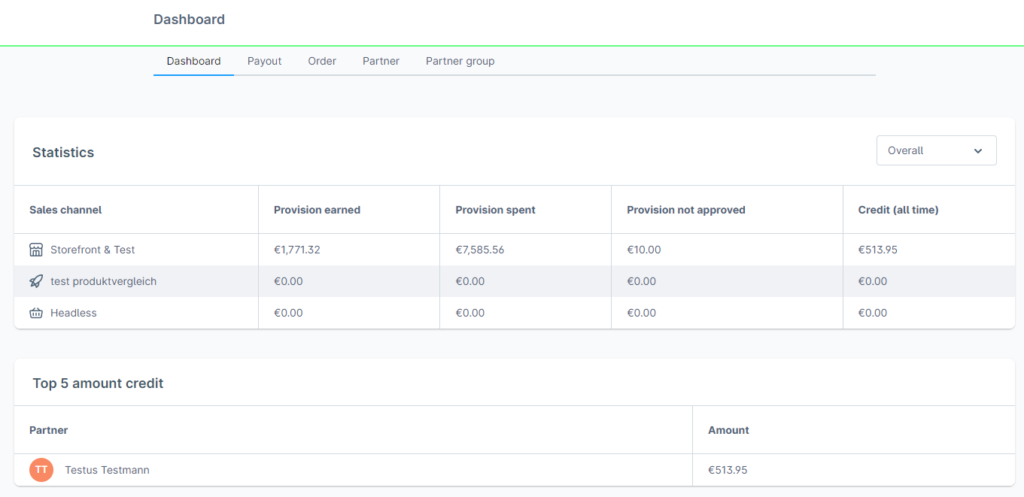
### Dashboard overview
The dashboard overview is displayed by default when you access the Admin Dashboard and provides a useful summary of recent activity metrics, separated into two tables (statistics and top 5 amount credit). Additionally you can see partner applications and edit them directly.
#### Statistics
The Statistics table summarizes provision data with the following columns:
* Sales channel
* Amount earned
* Amount spent
* Amount not approved
* Credit (all time)
Use the time range dropdown to filter the metrics displayed in the tables by
* Overall (default view)
* Last 30 days
* Last 14 days
* Last 7 days
* Last 24 hours
* Since yesterday
The longer the selected time range, the more data is summarized in the table.
#### Top 5 amount credit
A partners’s amount is the number of remaining provision they have. Provision can be redeemed against future vouchers, bonus points or as money.
This table displays the five customers with the highest amount balances, via the following columns:
* Customer
* Amount credit
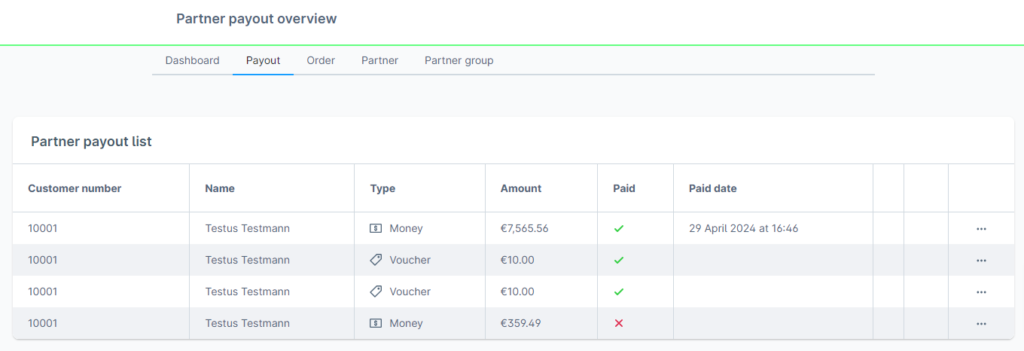
### Payout
The Payout tab contains a single table which summarizes all your partner’s payout. The payouts are working automaticly except a money payout. If partner is requesting a money payout you need to approve it. By clicking the three dots you can open the approve dialog. At this dialog you can the the bank data of your partner. Then you can use your bank software, so send them the money manually. After it’s finished you can approve the payout request. Optionally you can upload a payout PDF and send it to your partner.
The table contains the following columns:
* Customer number
* Customer name
* Type
* Amount
* Approved
* Paid date
Click the refresh button on the right to retrieve the latest data.
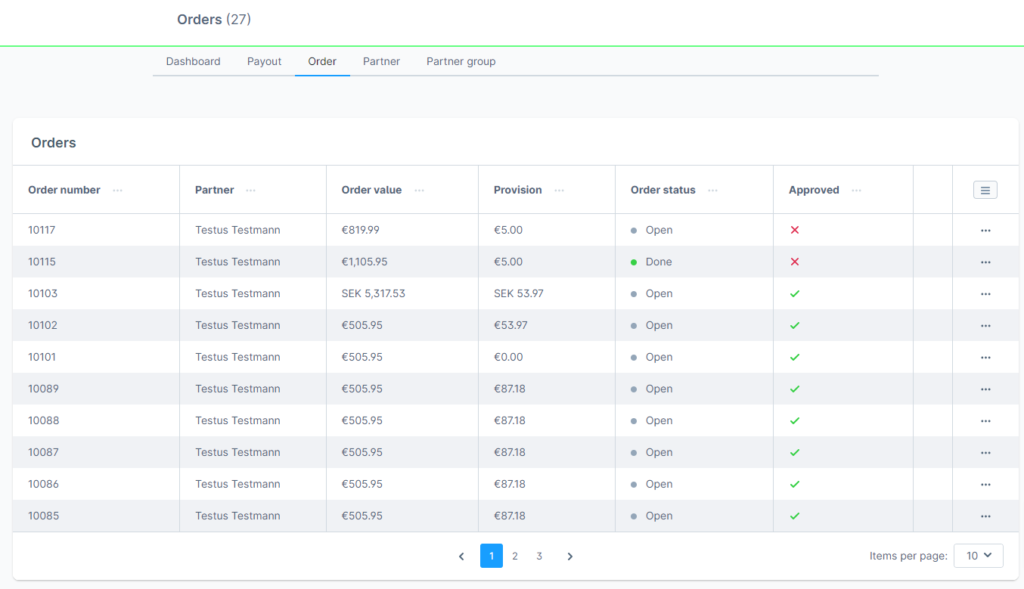
### Order
At the Order tab you can find all affiliate order from your partner.
The table contains the following columns:
* Order number
* Partner
* Order value
* Provision
* Order status
* Approved
**Click the** **stacked icon on the right-hand side of the table header to enable/disable columns and switch between compact and extended view**.
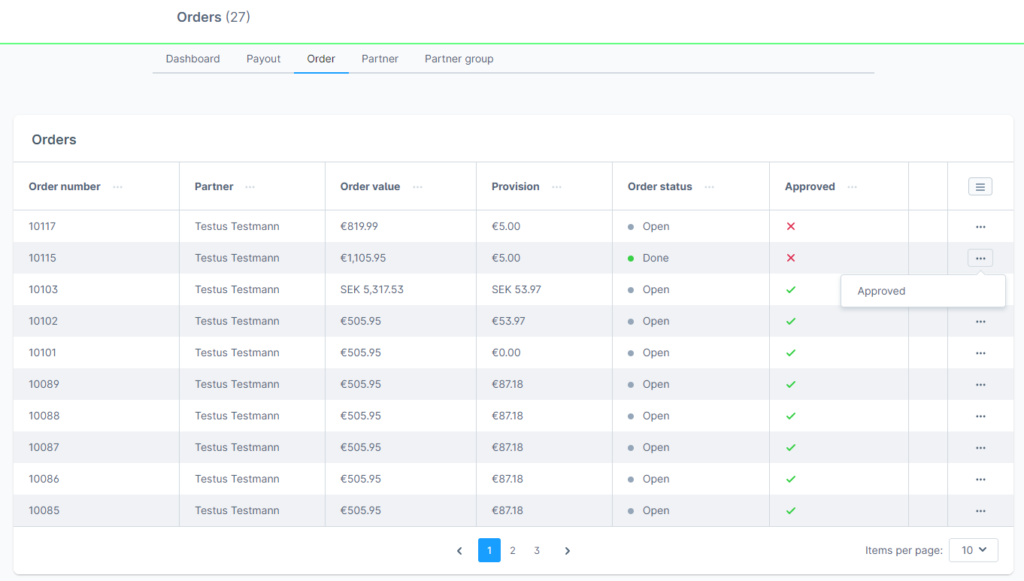
#### Manually activate provision
By default, when a customer makes a order, the provision of your partner must first be activated before they are available to them. Until activation, the partner cannot use the provision.
You can automate this activation process in the provision collect settings. If you enable automatic activation of points, they are available to the customer immediately upon a specific event, after which the customer can redeem them against purchases.
To manually activate provision associated with a order, click on the three dots at the order and select “Approved”.
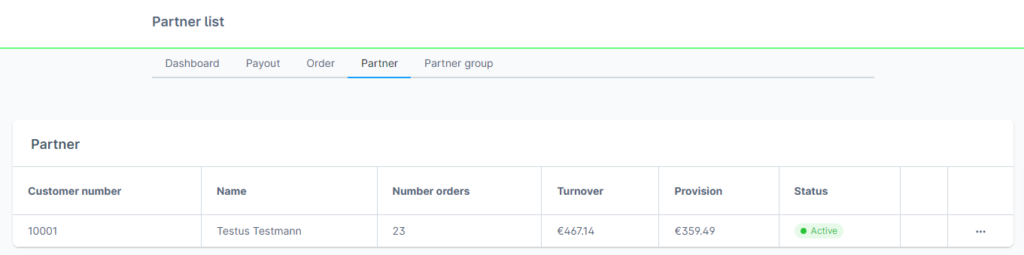
### Partner
The Partner tab contains a single table displaying a list of all of your shop partner, regardless of whether or not they have a provision balance. For partner that do have a provision balance, this is also shown within the table.
The displayed columns are:
* Customer number
* Name
* Number orders
* Turnover
* Provision
* Status
#### Edit partner
To edit any partner in the list, click the **…** icon and select **View.**
A summary of the partners’s details is displayed, including current provision, contact details, account status, customer group and partner group. Additionally you have a **Order** and **Payout** tab. There is the same functionality as described above but you will see only orders and payouts of the selected partner.
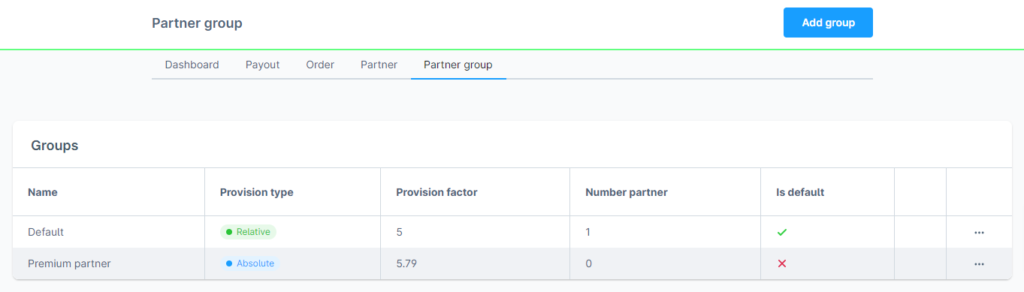
### Partner group
The Partner group tab contains a single table displaying a list of all groups in your system.
The displayed columns are:
* Name
* Provision type
* Provision factor
* Number partner
* Is default
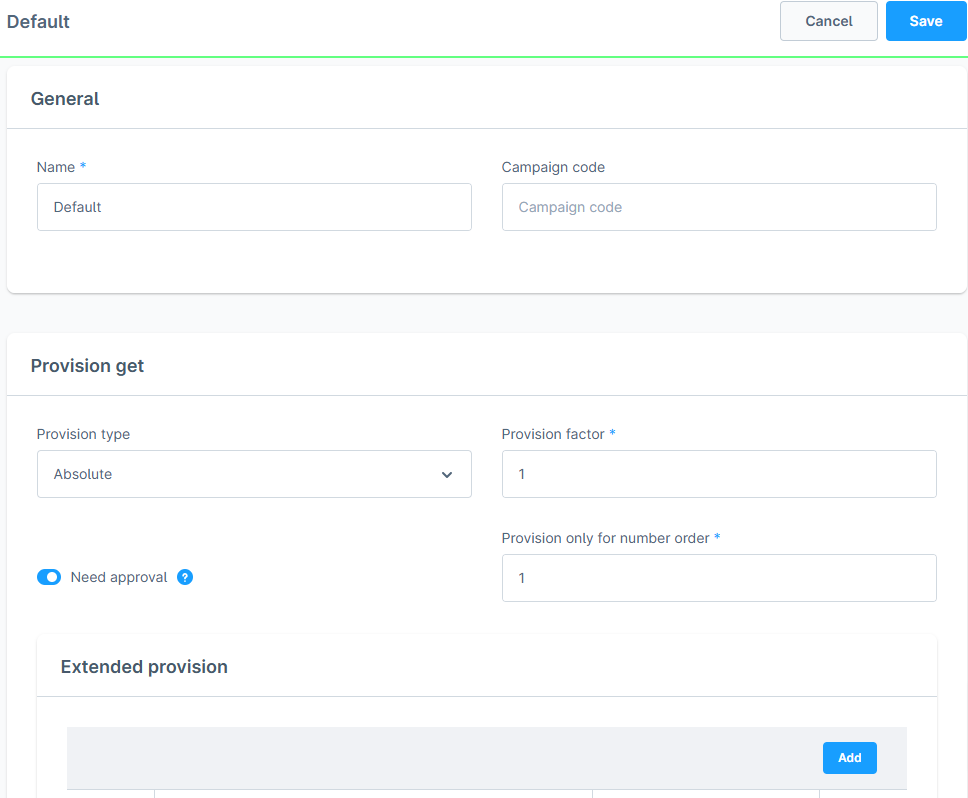
#### Create/ Edit partner group
To create a partner group click the button “Add group” in the head area of the administration. To edit a partner group click the three dots in partner group list and select “Edit”
| **Field** | **Type** | **Description** |
| ----------------------------------------------------------- | --------------- | ----------------------------------------------------------------------------------------------------------------------------------------------------------------------------------------------------------------------------------------------------------------------------------------------------------------------------------------------------------------------------------------------------------------------------------------------------------------------------------------------------------------------- |
| Name | Free text | Enter a meaningful name for the partner group, e.g. “Premium partner”. |
| Campaign code | Free text | You can enter a campaign code to make all orders of this partner group filterable. |
| Provision type | Dropdown | Choose wheter a provision for a order is relative or absolute. |
| Provision factor | Numerical input | Define the provision factor. If you selected a relative “provision type”, then enter a percentual value like 5 to enable partner to get 5% provision of a order. If you configured a absolute “provision type” then configure a provision like “5.91” to enable partner to get 5,91 EUR for a order. |
| Need approval | Toggle | If disabled a provision for a new order is provisioned directly. |
| Provision only for number order | Numeric input | Enter a value different from 0 to give a partner provision only for the first n-orders. A value of 0 means no limitation. |
| Extended provision | List/ Overlay | Define in detail which products gain what kind of provision and if it is only for one order or for following orders too. |
| Show advisor info – On register page | Toggle | Enable this toggle to show you customers at register page an info box with partner information like: Name and contact data. In Admin you can change snippet text by navigating to “Settings -> Shop -> Snippets” and searching for snippet “prems-affiliate.partner-infos-for-customer.register-page”. |
| Show advisor info – On account page | Toggle | Enable this toggle to show you customers at account page an info box with partner information like: Name and contact data. In Admin you can change snippet text by navigating to “Settings -> Shop -> Snippets” and searching for snippet “prems-affiliate.partner-infos-for-customer.account-home-page”. |
| Show advisor info – On chckout confirm page | Toggle | Enable this toggle to show you customers at checkout confirm page an info box with partner information like: Name and contact data. In Admin you can change snippet text by navigating to “Settings -> Shop -> Snippets” and searching for snippet “prems-affiliate.partner-infos-for-customer.confirm-page”. |
| Partner voucher – Enable voucher | Toggle |
Additionally to the affiliate link a partner can also get a voucher code to promote new customers. If a customer uses such a voucher code then he is automaticly assigned to the partner. Alternativ zum Affiliate Link können Ihre Partner auch einen Gutschein Code erhalten, mit dem sie neue Kunden werben. Nutzt ein Kunde diesen Gutschein Code, so wird er automatisch dem Partner zugewiesen.
|
| Partner voucher – Voucher type | Dropdown | Choose whether the voucher should be relative or absolute. |
| Partner voucher – Voucher amount | Numerical input | Define the value of the voucher. |
| Partner voucher – Name | Free text | Define a name for the voucher. The placeholder ###partnerCode### is necessary. |
| Partner voucher – Code | Free text | Define a voucher code. The placeholder ###partnerCode### is necessary. |
| Partner voucher – Max. total uses | Numerical input | Define how many users this voucher could have. |
| Partner voucher – Max. uses per customer | Numerical input | Choose the number of uses of the voucher for a customer. |
| Partner voucher – Prevent combination with other promotions | Toggle | Configure if other promotions are allowed when this voucher is used. |
| Redeem as voucher allowed | Toggle | Enable this setting to allow partner to get a voucher for provision. |
| Redeem as money allowed | Toggle | Enable this setting to allow partner to get money for provision. |
| Redeem as bonus points allowed | Toggle | Enable this setting to allow partner to get bonus points for provision. |
| Vouchers | Table | This area is only visible if “Redeem as voucher allowed” is activated. You can assign voucher from the “Marketing -> Promotion” area here and add a provision amount for which the partner can buy that voucher. Please choose only promotions with “Promotion codes – Code options” configured as “Individual promotion codes”. Please create no promotion code in that campaign manually. The promotion has to be status “active”, assigned to a suitable “Sales channel” and need to have a discount assigned to it. |
| Payout Scale – Min amount | Numerical input | This field is only visible if “Redeem as money allowed” is activated. Define the min provision a partner must have before a payout is possible. |
| Bonus points – Points per EUR | Numerical input | This field is only visible if “Redeem as bonus points allowed” is activated. Define the number of points here a partner would get for 1 EUR Provision. |
| Bonus points – Rounding | Numerical input | This field is only visible if “Redeem as bonus points allowed” is activated. Define the type of rouding provision to bonus points. |
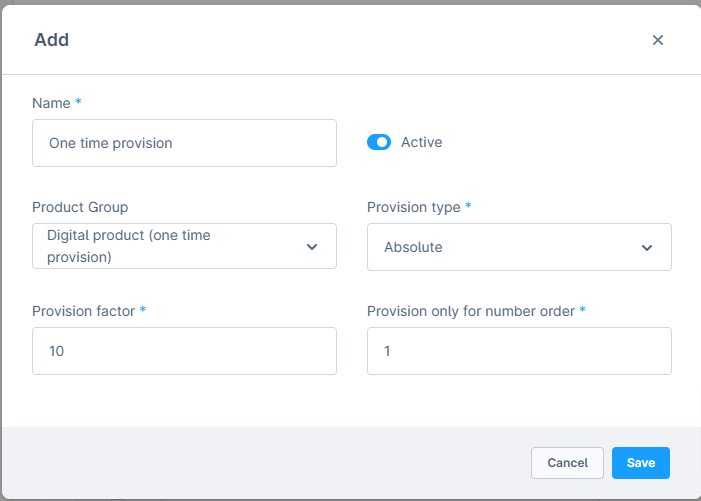
#### Extended provision
| **Field** | **Type** | **Description** |
| ------------------------------- | --------------- | ---------------------------------------------------------------------------------------------------------------------------------------------------------------------------------------------------------------------------------------------------------------------------------------------------- |
| Name | Free text | Enter a meaningful name for the extended provision, e.g. “One time provision”. |
| Product Group | Dropdown | Choose which products of a product group are effected by this provision setting. |
| Provision type | Dropdown | Choose wheter a provision for a order is relative or absolute. |
| Provision factor | Numerical input | Define the provision factor. If you selected a relative “provision type”, then enter a percentual value like 5 to enable partner to get 5% provision of a order. If you configured a absolute “provision type” then configure a provision like “5.91” to enable partner to get 5,91 EUR for a order. |
| Provision only for number order | Numeric input | Enter a value different from 0 to give a partner provision only for the first n-orders. A value of 0 means no limitation. |
#### Delete a partner group
To delete a partner group click the three dots in partner group list and select “Delete”.
Please note: The extension needs one default partner group towork properly. It is not possible to delete the group with the “Is default” flag.
If any partner group is deleted and partner are assigned to this group they will automaticly get the default partner group.
### Marketing page
Optionally you can create a page with marketing material for every partner group. This page is created as a shopping world page and shown in Shopware account area of the partner.
---
# Agent Instructions
This documentation is published with GitBook. GitBook is the documentation platform designed so that both humans and AI agents can read, navigate, and reason over technical content effectively. Learn more at gitbook.com.
## Querying This Documentation
If you need additional information that is not directly available in this page, you can query the documentation dynamically by asking a question.
Perform an HTTP GET request on the current page URL with the `ask` query parameter, and the optional `goal` query parameter:
```
GET https://docs.premsoft.de/en/plugins/affiliate-system/admin-dashboard.md?ask=&goal=
```
`ask` is the immediate question: it should be specific, self-contained, and written in natural language.
`goal` is optional and describes the broader end goal you are ultimately trying to accomplish on behalf of the user. GitBook uses it to tailor the answer towards what is most useful for that goal.
The response will contain a direct answer to the question and relevant excerpts and sources from the documentation.
Use this mechanism when the answer is not explicitly present in the current page, you need clarification or additional context, or you want to retrieve related documentation sections.